Speaking of collaboration, some of the Grade 10s came to me with an idea a while ago. They wanted to collaborate on a painting of a lion. There were three students involved -- Lily, Sophia, and Caitlyn -- so we divided a square of MDF board into 9 pieces. The students then used a transition of value from left to right. It was quite a project...great job! I noted that each of the students' strengths was visible in each vertical band. Look for it at the Blyth student art show in the spring.
Wednesday 18 December 2013
Collaboration!
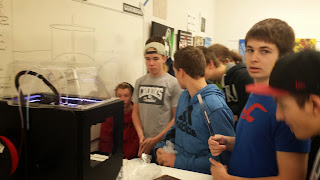
Our projects keep getting more complicated with the 3D printer and students keep collaborating to arrive at new exciting projects to print. We have printed a Camaro and a Bugatti for the students interested in automobile design. Here's some students waiting on the Camaro:
Friday 13 December 2013
Numeracy and Art Find a Common Ground
Hello students!
Today we have taken another step with the 3D printer. We worked as a class to figure out what our builds are costing us, depending on where we source our filament. ABS filament from our Canadian supplier costs us roughly $70 a kilogram after taxes and delivery. PLA filament (Plant-based and biodegradable) from Asia costs us $33.50 per kilogram delivered. Because we can order in values less than $70, duty and taxes are not applied at the border...BONUS!
Here is a picture of our equations!
In the example, a 20 gram print (see the Pacific Rim robot below) with the Canadian sourced filament cost $1.40 to print. Naturally, this excludes the cost of the purchase of the Makerbot and any ongoing maintenance. In the second example, the Alexander the Great print that we did came out to be 46 grams. If we had made the Alexander with the Asia sourced PLA filament, it would have cost us $1.54. What this equation allows us to do is recoup the costs associated with prints that students would like to make for personal purposes.
Here is Ben's robot:
Today we have taken another step with the 3D printer. We worked as a class to figure out what our builds are costing us, depending on where we source our filament. ABS filament from our Canadian supplier costs us roughly $70 a kilogram after taxes and delivery. PLA filament (Plant-based and biodegradable) from Asia costs us $33.50 per kilogram delivered. Because we can order in values less than $70, duty and taxes are not applied at the border...BONUS!
Here is a picture of our equations!
Here is Ben's robot:
It is exciting to know that we can get biodegradable filament for the Makerbot! What a great way to be environmentally conscious in our creating. "We do not inherit the earth from our ancestors. We borrow it from our children."
Wednesday 11 December 2013
Alexander the Great!
In the British Museum, a marble portrait of Alexander the Great is on display. It looks like this:
The following is an excerpt from the British Museum's website, www.britishmuseum.org:
The following is an excerpt from the British Museum's website, www.britishmuseum.org:
Marble portrait of Alexander the Great
Hellenistic Greek, 2nd-1st century BC
Said to be from Alexandria, Egypt
Said to be from Alexandria, Egypt
Youthful image of the conqueror king
Literary sources tell us, though perhaps not reliably, that Alexander (reigned 336-323 BC) chose only a few artists to produce his image, and famous names such as the sculptor Lysippos and the painter Apelles were associated with his portraiture. Though none of the famous images have been recovered, many sculptures in different materials, as well as portraits on gemstones and coins, survive. These were mostly produced long after Alexander's death and while the portraits follow similar general characteristics, they also vary in style.
Alexander was always shown clean-shaven, which was an innovation: all previous portraits of Greek statesmen or rulers had beards. This royal fashion lasted for almost five hundred years and almost all of the Hellenistic kings and Roman emperors until Hadrian were portrayed beardless. Alexander was the first king to wear the all-important royal diadem, a band of cloth tied around the hair that was to become the symbol of Hellenistic kingship.
Earlier portraits of Alexander, in heroic style, look more mature than the portraits made after his death, such as this example. These show a more youthful, though perhaps more god-like character. He has longer hair, a more dynamic tilt of the head and an upward gaze, resembling his description in literary sources.
This head was acquired in Alexandria, the city founded by Alexander in 331 BC, and the location of his tomb. Alexandria was also the capital of the longest surviving Hellenistic dynasty, the Ptolemies. From the time of the reign of Ptolemy I Soter ('Saviour') (305-282 BC), Alexander was worshipped as a god and the forefather of the dynasty.
The 3D printer was used to try to bring this to life for the students, and this was the result:
The original sculpture that this portrait was taken from may have been created by Lysippos.
Lysippos "...was a Greek sculptor of the 4th century BCE. Together with Scopas and Praxiteles, he is considered one of the three greatest sculptors of the Classical Greek era, bringing transition into the Hellenistic period. Problems confront the study of Lysippos because of the difficulty of identifying his style amongst the copies which survive. Not only did he have a large workshop and a large number of disciples in his immediate circle,[2] but also there is understood to have been a market for replicas of his work which was supplied also from outside his circle already in his own lifetime and also later in the Hellenistic and Roman periods" (source: wikipedia).
Here are a couple pieces thought to have been created by Lyssipos:
Hermes of Atalante
Socrates
Tuesday 10 December 2013
Continuing Work with the 3D Printer
Here's a quick update about our work with the 3D printer:
In this photo, Aric is learning more about Form, and technology, all at once. He is sculpting a 3D image in the program Sculptris. We then converted it to a .stl file in MeshLab.
We then printed a small rendition of his digital sculpture!
In this photo, Aric is learning more about Form, and technology, all at once. He is sculpting a 3D image in the program Sculptris. We then converted it to a .stl file in MeshLab.
We then printed a small rendition of his digital sculpture!
Thursday 5 December 2013
Sculptris Solution?
Yesterday, we had our first multi-
colour print. It came from the pre-loaded SD card. It came out nicely:
More importantly, we found a way to print from Sculptris, the 3D design software we have been using. First, I created a simple 3D head in Sculptris. I then Exported it from Sculptris, thus creating a .obj file. I then used MeshLab. I imported the .obj file into MeshLab. It looked like this:
I then Exported the project as a .stl file. MakerWare recognizes and can print .stl files.
Then it was just a matter of printing. An hour later:
GREAT SUCCESS! Now we came design in digital 3D as a class and print our work.
Stay tuned!
colour print. It came from the pre-loaded SD card. It came out nicely:
More importantly, we found a way to print from Sculptris, the 3D design software we have been using. First, I created a simple 3D head in Sculptris. I then Exported it from Sculptris, thus creating a .obj file. I then used MeshLab. I imported the .obj file into MeshLab. It looked like this:
I then Exported the project as a .stl file. MakerWare recognizes and can print .stl files.
GREAT SUCCESS! Now we came design in digital 3D as a class and print our work.
Stay tuned!
Wednesday 4 December 2013
Another day with the 3D printer!
Day two: Klein Bottle Complete
Felix Klein first described the Klein bottle in 1882. He envisioned a "closed manifold, meaning it is a compact manifold without boundary."
Now, wrapping my art mind around this was a little bit difficult, but this is a truly unique project. It's outside is its inside but it can still hold water?
Now, we are learning to sculpt digitally in 3D. Here's Erica sculpting on the computer!
Once we complete our sculptures, it is our goal to find a way to print using the Makerbot!
Felix Klein first described the Klein bottle in 1882. He envisioned a "closed manifold, meaning it is a compact manifold without boundary."
Felix's modern graphic might look like this:
This challenge came from Mr. Morley in the math department...could the 3D printer created a Klein bottle? If you give it a couple hours...YES!!
Now, we are learning to sculpt digitally in 3D. Here's Erica sculpting on the computer!
Once we complete our sculptures, it is our goal to find a way to print using the Makerbot!
Tuesday 3 December 2013
The 3D Printer has Arrived!!
GDCI has an exciting new piece of technology - A Makerbot 3D Printer!!!
When the boxes first arrived...I have to admit I was a little nervous about the set-up!
I was sure to follow the directions carefully. I felt like a novice...new tech can be a little intimidating!
Fortunately, it was a pretty smooth install. In about 20 minutes the Makerbot was up and running!
The students all gathered around. For some, myself included, this was the first time ever seeing an object printed in three dimensions!
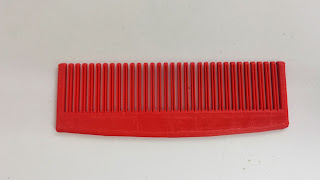
For an initial test print, I chose an object that would have real world usability, though perhaps not for me :). We printed a comb.
I may sound like such a newbie, but it was pretty awesome to watch the printer come to life, the spools slowly feeding filament into the extruders. I realized we were going to need to learn what the components of the printer were.
Here's Hayden with the comb:
And Mackenzie and Christina:
I began to see the irony of choosing a comb as our first 3D print.....
We decided to try printing an architectural structure as our second print. Wall street!
Trying a cross-curricular approach, we got a Klein Bottle 3D imagery:
The print should be ready for tomorrow!
All things told, it was an exciting first day with the Makerbot! Stay tuned as we learn together, printing with greater complexity and creativity!
All things told, it was an exciting first day with the Makerbot! Stay tuned as we learn together, printing with greater complexity and creativity!
Subscribe to:
Posts (Atom)


